buy2fix
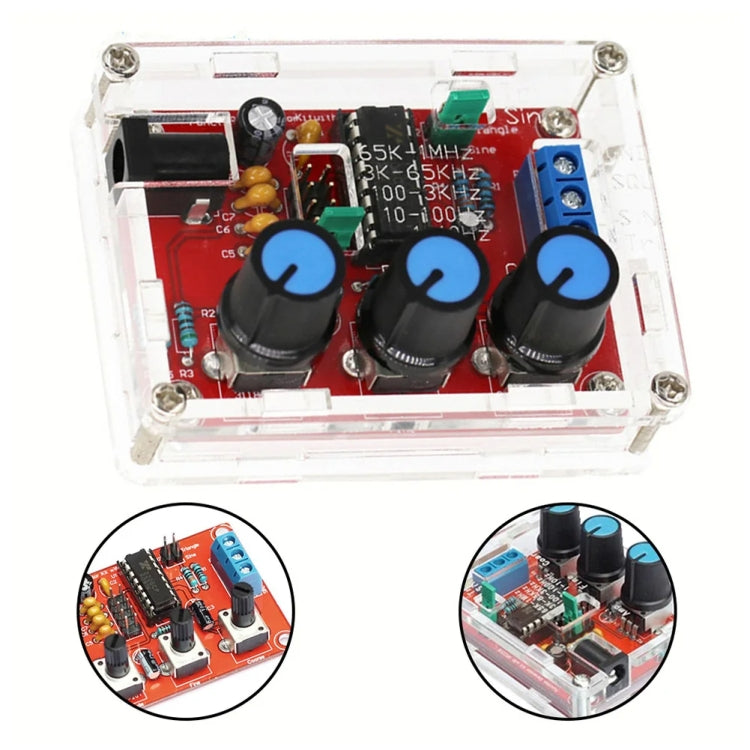
XR2206 High Precision Signal Generator DIY Kit Sine Triangle Square Waves 1Hz-1MHz Frequency Range, Specification: Parts
XR2206 High Precision Signal Generator DIY Kit Sine Triangle Square Waves 1Hz-1MHz Frequency Range, Specification: Parts
🔥 Buy any 2 items, get 25% off 3rd item 🔥 Ends today!
Couldn't load pickup availability
Shipping Guarantee
Shipping Guarantee
FRRE SHIPPING on all UK orders. Fully Insured.
Handling time 1 - 3 working days. (Buy2fix has to process your order and put all your items through its strict quality-control tests.)
Transit time 5 - 10 working days.
Return Guarantee
Return Guarantee
For whatever reason if you are unsatisfied with your order within 7 days you can return it to us in new condition for a refund minus the shipping charges.
DOA Guarantee
DOA Guarantee
If your item arrives damaged, please contact us within 7 days and provide clear and valid proof. Buy2fix will make compensation based on the damage situation.
Missing/Wrong Items Guarantee
Missing/Wrong Items Guarantee
If you receive a parcel with missing/incorrect/secondary packing items, please contact us within 7 days of delivery and provide the relevant proof. Buy2fix will make compensation based on the damage situation.
1. Power supply voltage: 9-12VDC input
2. Waveforms: square, sine and triangle waves
3. Impedance: about 600 ohms
4. Frequency: 1Hz-1MHz
5. Sine wave:
-Amplitude: 0-3V (9V DC input)
-Distortion: Less than 1 percent (at 1kHz)
-Flatness: +0.05dB 1Hz-100kHz
6. Square wave:
-Amplitude: 8V (no load 9V DC input)
-Rise Time: Less than 50ns (at 1kHz)
-Fall time: less than 30ns (at 1kHz)
-Symmetry: Less than 5 percent (at 1kHz)
7. Triangle wave:
-Amplitude: 0-3V (at 9V DC input)
-Linearity: Less than 1 percent (up to 100kHz) 10mA
Circuit features:
1. It can generate sine wave, triangle wave and square wave
2. Frequency can be from 1HZ-1MHZ, frequency, amplitude adjustable
3. 5-bit precision resolution, frequency adjustment with coarse and fine tuning
4. Wide range of power supply, can use external power supply 9-12V or 9V battery
5. All direct insertion components, the number of components is small, simple installation and commissioning
Precautions for soldering and mounting, please follow the steps below:
1. Components are welded to the front panel, from low to high principle, that is, the first welding low-end components, such as capacitors, resistors, diodes, etc.
2. Welding IC sockets, terminals, and finally the power socket, adjustable potentiometer
3. Behind the use of diagonal pliers to try to cut short pins
Debugging steps:
1. After completing the welding of the IC, XR2206, pay attention to the direction of the IC, the insertion may damage the chip
2. Check whether the IC is reverse, such as reverse, please correct in a timely manner
3. Insert the power supply, the power supply is 5.5 x 2.1 port, inside and outside the negative pole, the power supply voltage is 9-12V, more than 12V waveform may be unstable
Steps for use:
1. Insert J1 jumper cap, SIN/TRI blue terminal output sine wave (note that J1, J2 can only be inserted into one of the)
2. Insert J2 jumper cap, SIN/TRI blue terminal output triangle wave (note that J1, J2 can only be inserted into one)
3. SQU blue terminal outputs pulse
4. AMP: sine wave, triangle amplitude adjustment
5. FINE: frequency fine-tuning
6. Coarse: frequency coarse adjustment